
Introduction
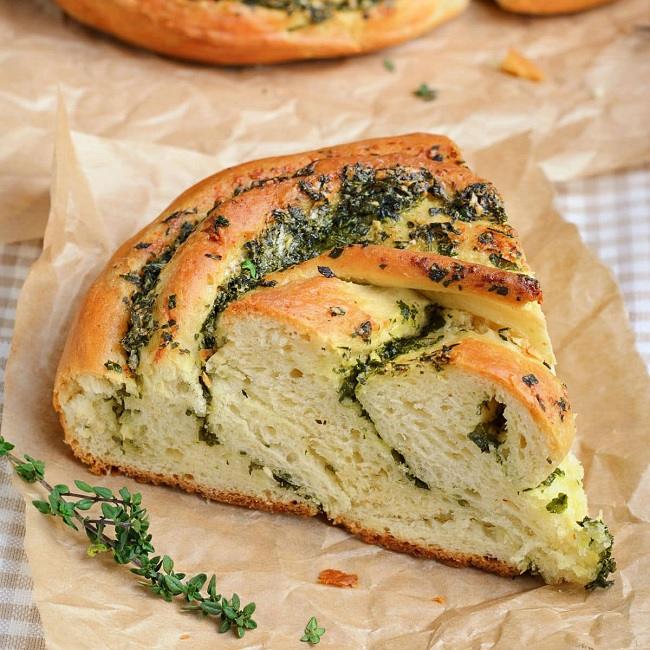
One of those easy-to-prepare foods that is special every time is garlic and herb bread. Soft with gentle crispness on the edges and loaded with fresh garlic and herbs. Serve with pasta, soup or a snack. The only good thing is that you don’t have to be a genius baker to prepare it at home.
This garlic and herb bread recipe is very easy and will give you bakery style bread. Simple items from your pantry can make a good, flavorful meal. With careful following of the instructions you will find that you obtain soft, fluffy bread with a golden crust.
This is a bread I have made countless times at home, and I will give you some simple tips that really do the trick. These guidelines will help you to avoid some of the common pitfalls and ensure you get the texture and flavor you’re looking for.
This garlic and herb bread recipe is tested in the kitchen, easy to make, and includes tips that will ensure your bread is soft and flavorful every time.
Ingredients for garlic and herb bread recipe from scratch
Prior to beginning, collect all ingredients. Fresh ingredients really do taste so much better, particularly in the case of garlic and herbs.
- 3 cups all-purpose flour
- 2 teaspoons instant yeast
- 1 teaspoon sugar
- 1 teaspoon salt
- 1 cup warm water
- 3 tablespoons butter (softened)
- 4 cloves garlic (finely chopped)
- 1 Tablespoon fresh parsley (chopped)
- To every 1 tablespoon of fresh oregano/mixed herbs, add:
- 2 tablespoons olive oil
- 1 tablespoon milk (to brush)
Temperature of water should be warm, not hot. Yeast can be killed by hot water and prevent dough from rising.
Easy homemade garlic and herb bread recipe step by step
In a bowl, combine the yeast, sugar and warm water. Allow to rest for approximately 5 minutes. Bubbles will start to appear on top. This means that the yeast is alive.
Add flour and salt to the mixture. Combine until soft dough is formed. The dough shouldn’t be so sticky or so dry. If it is sticky, stir in the remaining flour. Add a few drops of water if it is dry.
Knead for approximately 8-10 minutes. This step is crucial as it helps the structure of the bread. The dough should be smooth and elastic.
Transfer the dough to a greased bowl, and set aside covered with a cloth. Let it rest for about 1 hour or until it doubles in size. Store in a warm location for increased rising.
Meanwhile, make the garlic herb mixture. In a small bowl, combine butter, garlic, parsley and herbs. This blend will provide the bread with its flavour.
After the dough has risen, gently punch it down to release the air. Spread it out into a rectangle. Apply evenly over the dough the garlic herb mixture.
Roll the dough to form a log or fold it into layers, as you prefer. Arrange in a greased baking sheet
Cover and allow to rise once again for 20-30 minutes. This is the second increase, which softens the bread.
Sprinkle on the milk and brush to achieve a golden hue. Bake in a preheated oven at 180°C (350°F) for about 25 to 30 minutes.
Allow to cool a little before cutting. The softness and the strong garlic aroma will be apparent to you.
Best garlic and herb bread recipe for beginners at home
This recipe is the perfect one for a beginner baker. Does not involve special equipment, and uses simple steps.
A crucial tip is to ensure you take measurements correctly. When using too much flour, the bread may turn out dense. It doesn’t take much to make it gluey.
Be sure to test your yeast before using it. It may not be active if it doesn’t bubble in warm water.
Another tip is to not hurry the rising time. The development of flavor and texture takes time to make good bread. If your kitchen is cool, you can put the dough in the oven with the light on!
Be careful not to over bake bread. Monitor the colour. It is ready when it turns golden brown.
Here’s how to bake soft bread that’s a tasty balance of garlic. The amount of garlic can be varied according to taste.
Soft garlic and herb bread recipe with yeast tips
The magic ingredient in soft bread is yeast. Once you grasp the mechanics of it, your bread will come out great each time.
Only use fresh yeast. Keep properly in a cold place. Fresh yeast is essential for good results, and expired yeast will not produce good results.
The temperature of the water is very critical. It should be warm but not hot to the touch. Around 100°F to 110°F is ideal.
Kneading makes the dough stretchy. This will help to retain air during rising to make the bread soft.
Allow the dough to rise in a covered bowl. This will avoid drying it out. Either plastic wrap or a clean cloth can be used.
The second rise is not to be skipped. It has moisture-absorbing properties as well as lightened the bread.
If your bread is hard, it may be because you have over baked it or too much flour. Experiment with these changes the next time.
Garlic and herb bread recipe without oven method
This bread can also be made at home if you don’t have an oven. If you don’t have a heavy pan, or a pressure cooker, you can use an alternative.
Make the dough as described above. Shape the bread and allow to rise.
Heat heavy pan over low heat. Use a stand or ring to allow the bread tray to sit up out of the pan.
Put the bread in, and cover the pan tightly. Simmer 30-35 minutes.
If necessary, carefully turn the bread over 90 degrees.
A second way is by using a pressure cooker that doesn’t have a whistle. Preheat the cooker, add the bread and cook on low heat.
It may be a little different in texture than oven baked bread, but it will still be soft and tasty.
Quick garlic and herb bread recipe using simple ingredients
For a quick bread, you can quickly make this bread. The same process is repeated, but with some modifications. To cut down waiting time, use instant yeast. Does not require long activation and is faster in operation.
The dough can also be lowered slightly the first rise if it rises rapidly in a warm place. A different trick is to roll smaller loaves rather than a large loaf. The smaller pieces bake quicker and will save time.
The flavour is still good despite these shortcuts due to the garlic and herbs. Use dried herbs or try them if fresh are not available. The taste will still be good. This is a fast version to make for fresh bread when time is of the essence.
Serving ideas and storage tips
There are numerous ways to serve garlic and herb bread. It is a good complement to pasta, soups and salads. It’s a great side to grilled chicken or veggies as well!
For an extra special touch, top with cheese and bake. It will melt and add a very flavorful taste!
Store bread in an airtight container. Can be stored at room temperature for 2 days.
It can be refrigerated up to 5 days. Reheat before serving to bring back the softness.
Another alternative is to freeze it. Place in foil and freeze. It can persist for one month.
If necessary, defrost and cook in the oven for a couple of minutes.
Common mistakes to avoid
In many instances people have problems making bread; most of these are simple to solve.
- One common mistake is using too much flour. This results in heavy and dry bread.
- Yet another error is under-kneading. The consequence of this is poor texture.
- The rise time is also an issue. The bread will not be soft if it does not rise properly.
- Do not use too much garlic because it may overpower the flavor. Balance is important.
- Very high temperatures can cause the outside to burn and the inside to remain undercooked.
With these tips in mind, you can be sure your bread will be perfect.
Read our new Article: Authentic Mexican Chicken Tinga Recipe
Conclusion
Garlic and herb bread is a simple and flavorful bread. Eliminating the stress of baking fresh bread at home is as easy as pie with the right ingredients and procedure. This recipe is easy and versatile. Flavors can be varied, different shapes can be used, and even baked without an oven!
After you try it, you’ll want to make it over and over again. Homemade bread is always better tasting than store-bought bread and the aroma is enough to make it worth the effort. Take the time, follow this guide and enjoy the process! You will always have a soft, warm and yummy garlic and herb bread.